free web builder

-From Measuring to Reporting in ErgoAnalysis-

Quick overview of the measurement flow and steps to take in fairly chronological order

Before the measurement

1. Charge the MCells. A battery level of at least 50 % is recommended for a 2 hour measurement.
2. Ensure that the MCells have enough memory. Before erasing data ensure that you have downloaded all necessary measurements to ErgoLink database.
3. Charge the phone, watch and any other battery. For measurements over 2 h it is recommended to use an extra battery for the phone.
4. Fill spray bottles with water and ensure that you have enugh moisturizing gel.
5. Pack up all the equipment, mentioned in the checklist

Onboard the volunteers

1. Fill in the questionnaire with the participant
2. Find clothes of the right size and moisten the electrodes with water spray.
3. Ask the participant to apply moisturising gel on his/her skin in areas where the electrodes will be placed on. Assist in dressing the shirt (and shorts if used). Ensure that the electrodes are in optimal position over the muscle and in good contact with the skin.
4. After the clothes are on fix the suspenders and tighten them properly so that they cover the trapezius electrodes.


Prepare the devices

1. Attach the phone to the tripod for use. Connect the extra battery to the phone.
2. Place the watch to the participants wrist (preferably on the left arm) and tighten the strap properly. Press the button at front to open the ErgoWatch app
3. Place MCells to the clothes. Make sure that MCells are in idle state (blue LED blinks every 3 seconds).


Connect and Start

1. Open ErgoMobile app. Check that the device numbers of the selected MCells correspond to those in use. If not, click on “SELECT DEVICES AND CONNECT”. Select the devices you want to use and unselect irrelevant ones. If you do not see all, press “RESET SELECTED” and wait for the updated list for new selection.

2. Press “SAVE AND CONNECT”. The device colour turns green once connected. If all devices are not connected press reconnect devices.
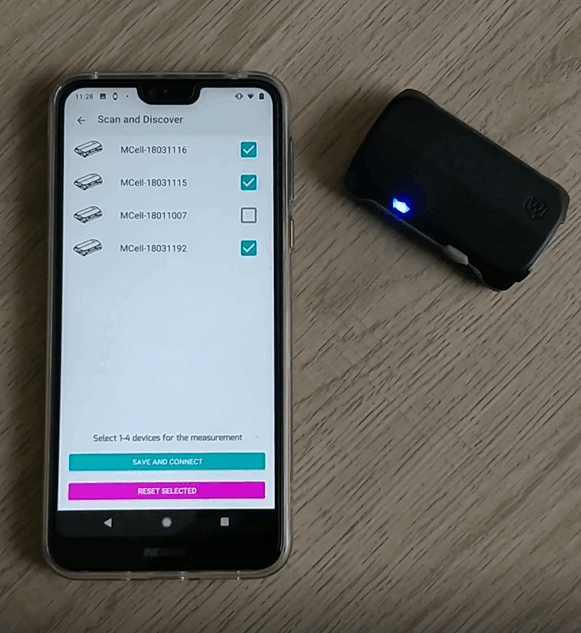
Select devices

3. When all devices are connected, click “START MEASUREMENT”.

4. You will hear a short sound with a vibration from the Mcells when measurement is started. Mcell led colour turns green to indicate that they are recording.

If you are using the ErgoAnalysis protocol it is recommended to perform MVC tests and angle offset. See separate instructions.

Measurement ongoing

1. Visually confirm that all the MCells are blinking green light (recording)
2. Check that the ErgoWatch app has moved to the recording view.
3. In the ErgoMobile app, click 'REC' to record video and 'STOP' to stop recording.
4. Keep observing, that the battery and free space is not drained empty.

Note: It is advisable to pause the video during breaks or whenever it is not needed. Do not make a single video longer that three hours.

If you are using the ErgoAnalysis protocol perform the angle offset (instructions here) once more just before the measurement is stopped.

5. When the measurement session is completed stop the video and swipe left to the stop screen.

6. If the device symbols are not indicated in green click 'RECONNECT DEVICES' when you are near the participant.

7. Stop the measurement by holding 'STOP MEASUREMENT' as instructed. When the measurement has ended the MCells vibrate and the LEDs turn blue.

8. At the SUMMARY –window, wait for the watch to sync data with the phone. When ‘Heart rate data ready’ –message appears, click 'FINISH' to complete the measurement.

9. You are done! Remove the clothes and devices from the participant

Download and analyze data in ErgoLink

1. Start ErgoLink
2. Connect all the MCells and the phone to the PC, using USB-hub. Allow the PC to enter the phones memory by confiming the message on phone’s window.
3. In ErgoLink's page 'Project management', create a 'Project' for the data.
4. Create a 'Participant' with necessary information to the Project.
5. Select the Participant and head to the page 'Download Measurement'
6. Make sure all the devices and the phone is visible in the Download page. If not, resort to troubleshoot
7. Under each MCell device, select the correct starting time of the measurement to the dropdown box. For the phone, to the upper box, select the measurement file('start_time.csv'), from the phone memory. It is stored at: 
*Phone root*\Documents\Myontec\Ergo Analysis\*Start Time*\

Next, for the bottom box, select any and all video files, captured during the measurement. They are at path:
*Phone root*\Pictures\Myontec\Ergo Analysis\*Start Time*\

8. When all is selected, check that all seems OK and click 'Transfer Files'
9. The data should now appear as a file under the selected participant. Open the file by double-clicking it.


Splice and prepare the data for reporting

1. After opening the data, check that there are data sources from heart rate, emg, angles and video. The X-axis of chart represents time and duration of the measurement.
2. So set the reference values, select 'Add MVC' using the cursor at the start- and endpoint of the desired area.
When successful, the MVC are will be highlighted with red color and values are shown.
By default, the values use 'running 1 second max' for each channel. If you wish to change the reference values, they can now be edited manually.
3. Move the cursor to a point where the volunteer is keeping the arms and back at neutral position. Click 'Set angles to zero' to offset angles to correct position.
4. Under AOI's, create tasks by clicking 'Manage AOI's'. Create any number of tasks.
5. Move the cursor to a desired area start, click 'Add AOI'. Find the cursor to the area end and click the button again. The selected area is highlighted with green hue and added to the AOI list. Assign any craeted task name to the AOI. Create as many number of tasks as necessary. Tasks may also be overlapping each other.
6. After all AOIs are created, click 'Save' (or at any previous point). You may now leave the open measurement.
7. You are done at preparing the file. Repeat for all measurements.


Creating a project and report to ErgoCloud

1. After you have at least one measurement file prepared, with at least one AOI assigned to a task, move to 'Home-page'.
2. At home page, log in with your ErgoCloud-account. Next, head to 'Project page'
3. At Project page, Select the previous project and click 'Create Project to Cloud'. The project should be now created under your account. Move to the 'Upload Reports -page'
4. The reports page should list all the created tasks for the project. Select one.
5. On the right, select any or all measurement you wish to include to the report.
6. You can preview some of the values of the report, by clicking 'Preview'.
7. If the report looks satisfactory, click the 'Upload Quick report'. You may give an additional description to the report.
8. If everything was successful, you are done! Next log in to the ergo.myontec.com at your browser.


Working at the ErgoCloud

1. Log in to your account at 'https://ergo.myontec.com
2. You are presented with all of your created projects, select one.
3. In project details, at the bottom, check that the uploaded quick report is found and it can be viewed.
4. Add any clients you wish to share the report with.
5. Add any service provider you wish to have access to share and modify the project content.
6. To make the report visible to clients, click 'Publish', next to mentioned report.
7. Congratulations! The report is now ready and shared with the selected stakeholders!
8. To cover other attachments and features, check the more in-depth tutorials.